Get started with the extension
Interledger Foundation’s Web Monetization browser extension lets you support your favorite web monetized sites directly from your web browser in a quick, non-intrusive, and privacy-preserving way.
About web monetized sites
You can only use the extension to send payments to web monetized sites. Interledger Foundation encourages content owners and publishers to tell their audience they’re web monetized via a banner or some other method.
If you’re interested in web monetizing your own content, the get started page for developers is a good place to start.
About Web Monetization payments
To make Web Monetization payments, you only need a digital wallet account from a Web Monetization-compatible wallet provider. There’s no site-by-site account or subscription required.
A web monetized site can’t pull payments from your wallet. When you link the browser extension to your wallet, you’re giving the extension permission to send payments on your behalf. These payments are automatically and continuously sent to each web monetized site you visit. You can also globally disable continuous payments.
The sites you pay aren’t provided with any of your personally identifiable information, such as your name, email address, or IP address.
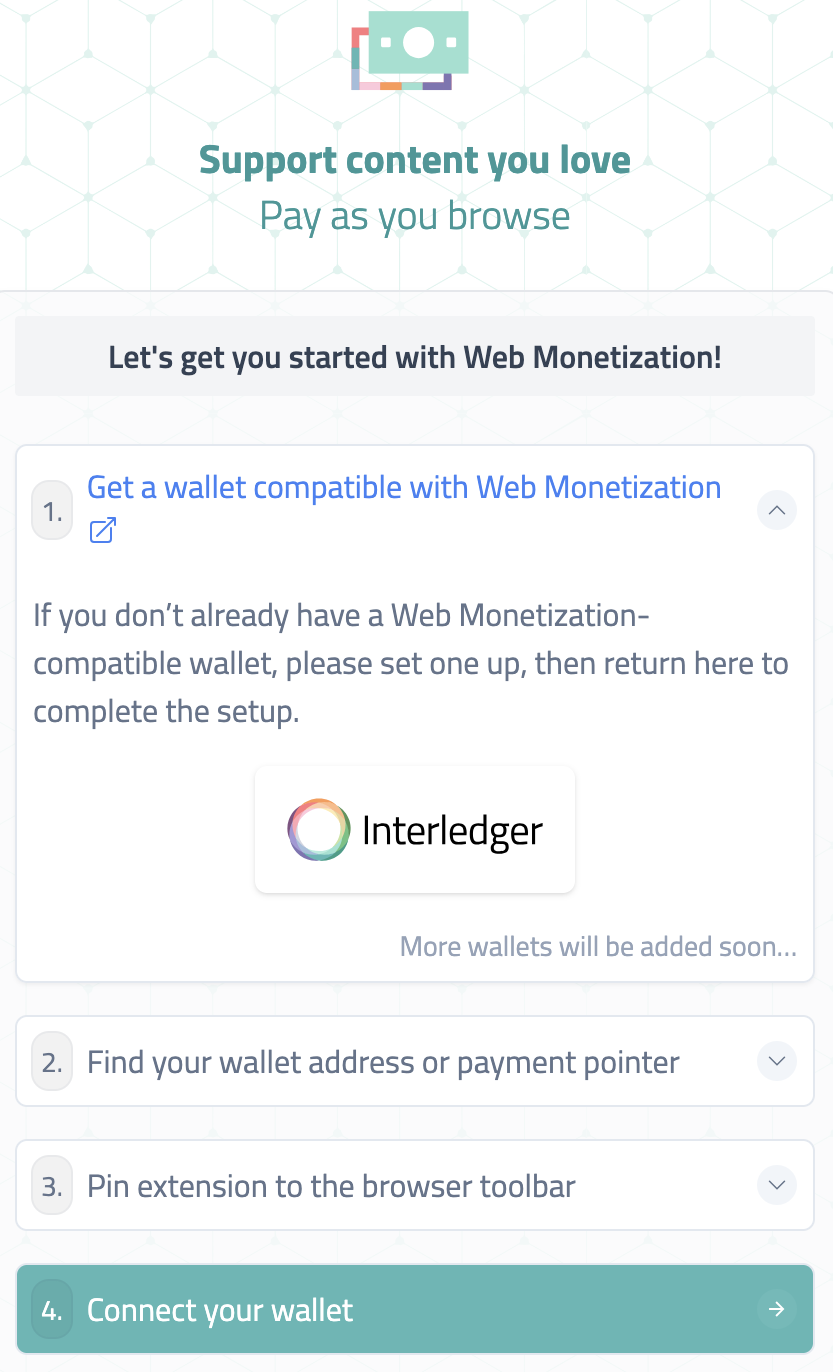
Install the extension
Section titled “Install the extension”


Configure the extension
Section titled “Configure the extension”After you install the extension, a page appears to guide you through the configuration steps.
-
Get a Web Monetization-compatible wallet. You may experience a delay before you can fund your wallet while your provider performs necessary regulatory checks.
-
Find and copy your wallet address (Interledger) or payment pointer (GateHub). You’ll need it for Step 4. Wallet addresses follow the format of
https://wallet.example.com/alice. Payment pointers follow the format of$wallet.example.com/alice.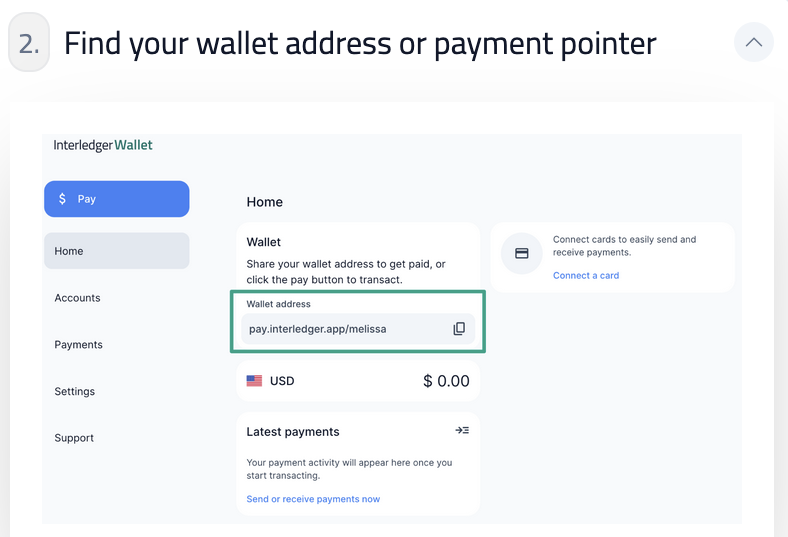
-
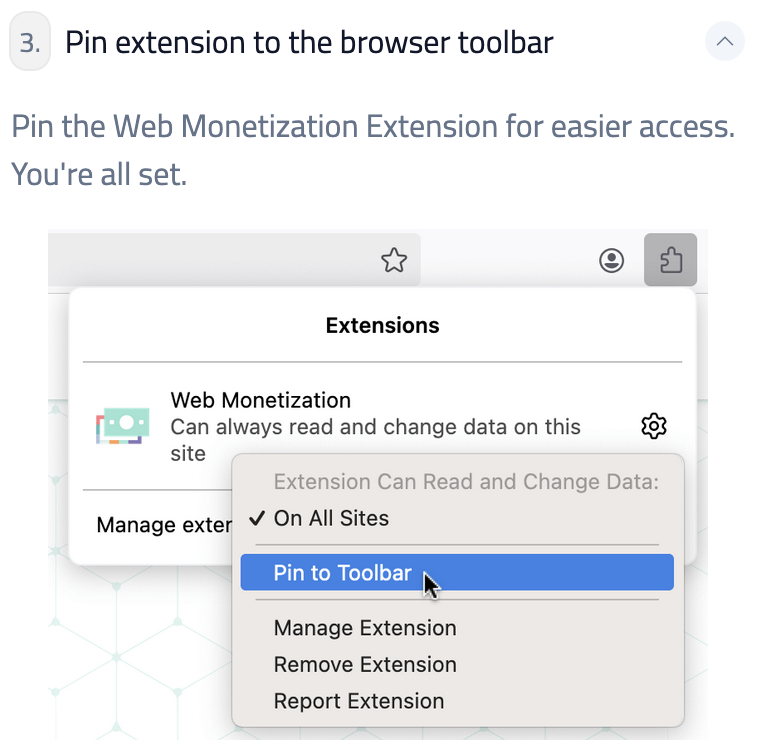
Pin the extension to your toolbar (optional).
-
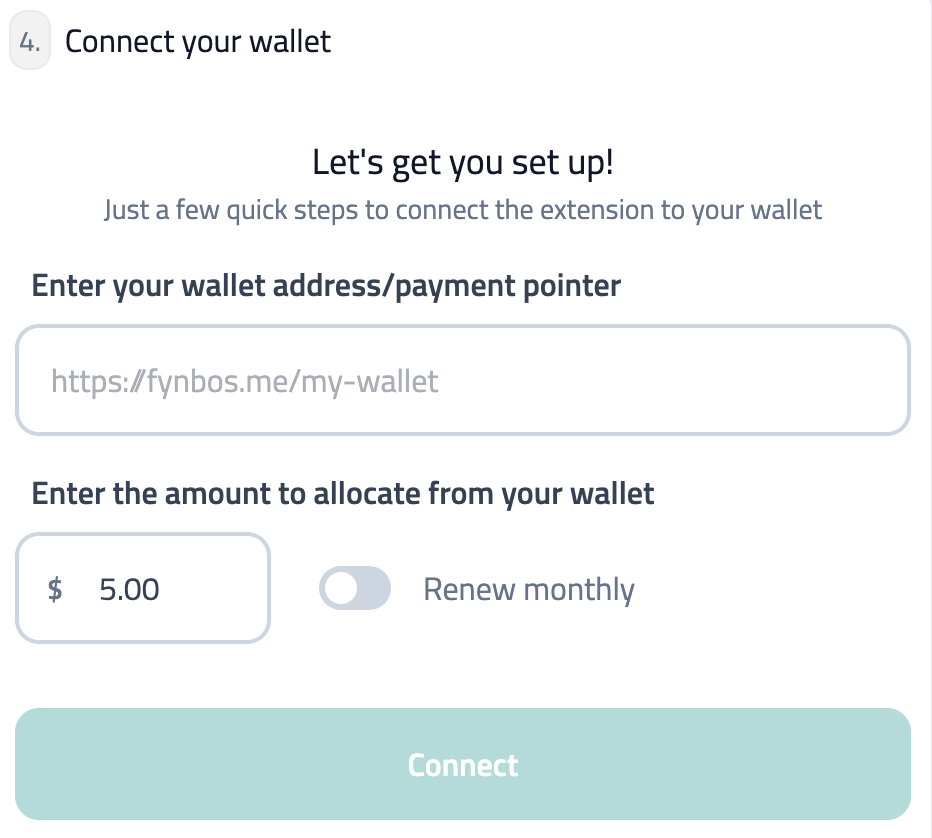
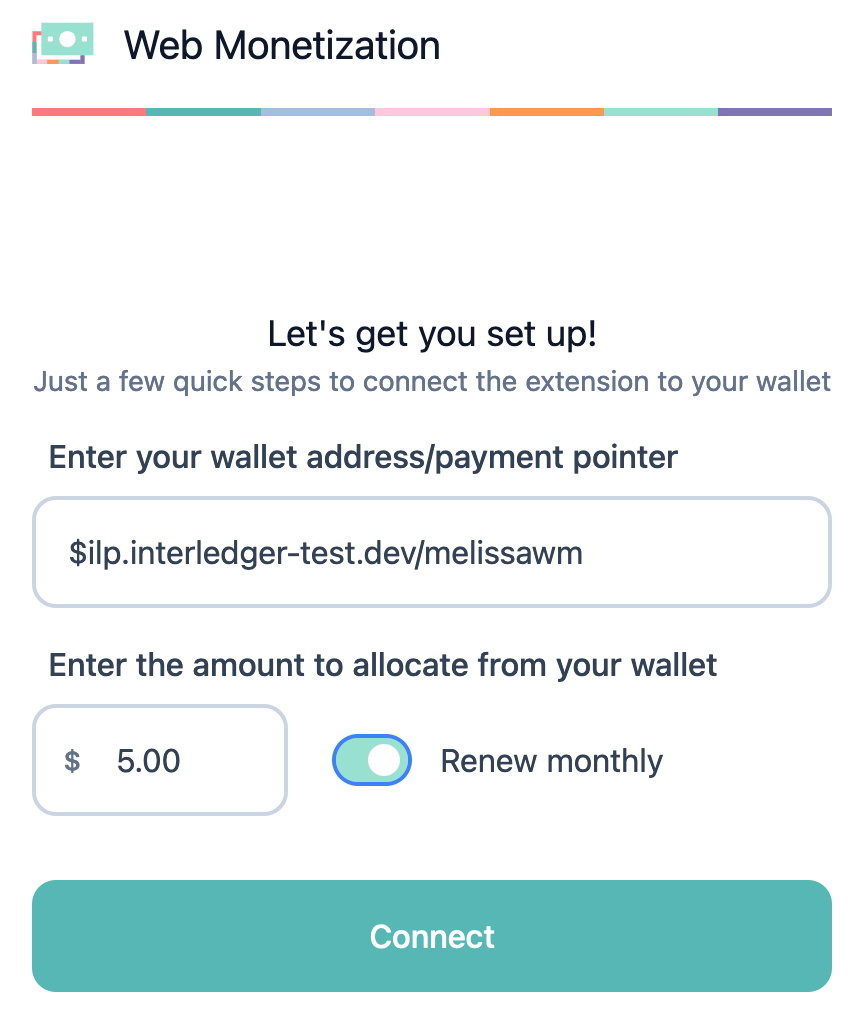
Enter the wallet address or payment pointer you found in Step 2.
-
Enter the amount the extension will have permission to send and select whether the amount should renew monthly. You can always change these settings later.
The amount and renewal frequency is specific to the extension you’re setting up. If you install the extension on a different browser and connect to the same wallet, that extension will have a separate budget. Payments made from one budget don’t affect the balance of the other.
-
Click Connect, then click Agree to allow the extension to connect to your wallet account.
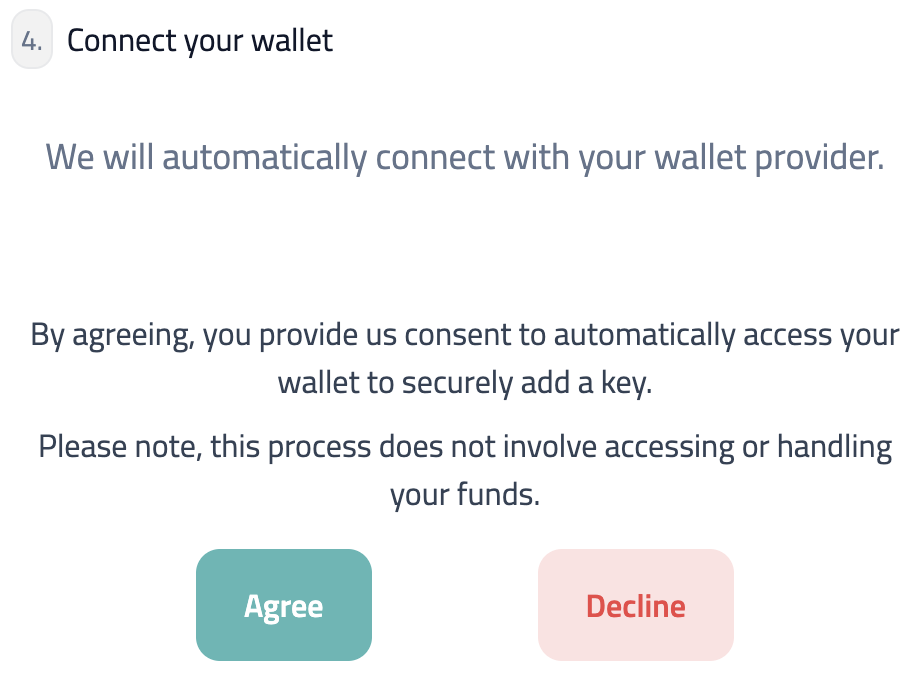
If your wallet provider’s website opens in your browser, proceed to the next step. If you receive a connection error, review the instructions for resolving the error.
-
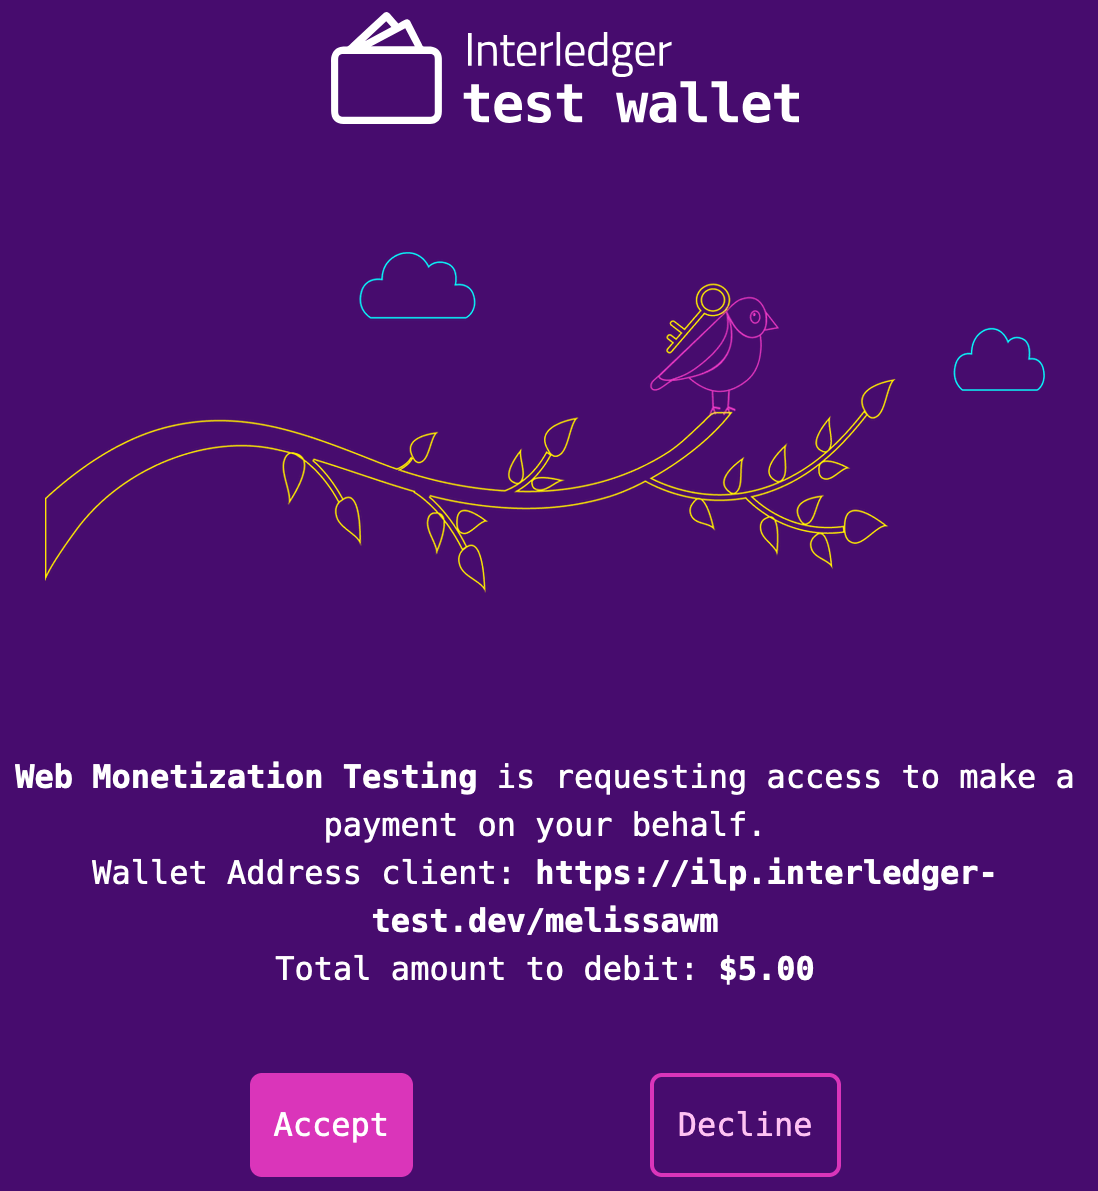
Sign in to your wallet account if you haven’t already, then confirm the connection and budget amount. For example:
-
A success screen appears when the connection is made. You can close the tab.

You’re now ready to set up continuous payments.
Set up continuous payments
Section titled “Set up continuous payments”About continuous payments
Section titled “About continuous payments”By default, the extension is set to send continuous payments at a rate of $0.60 USD an hour ($0.01 a minute). If you transact in a currency other than USD, then the extension will default to your currency’s equivalent based on the exchange rate. For example, if you transact in Mexican pesos, $0.60 USD is equivalent to around MX $11.70. The extension will default to MX $11.70 an hour.
Payments continue for as long as a web monetized page is active and in view. Continuous payments stop if you:
- Disable the extension
- Disable continuous payments in the extension’s settings
- Minimize your browser
- Change the focus away from the tab/switch to a different tab
- Close the tab or browser
- Spend all of your budget
Change your continuous payment settings
Section titled “Change your continuous payment settings”- Click the Settings icon in the upper-right of the extension.
- Select the Rate tab.
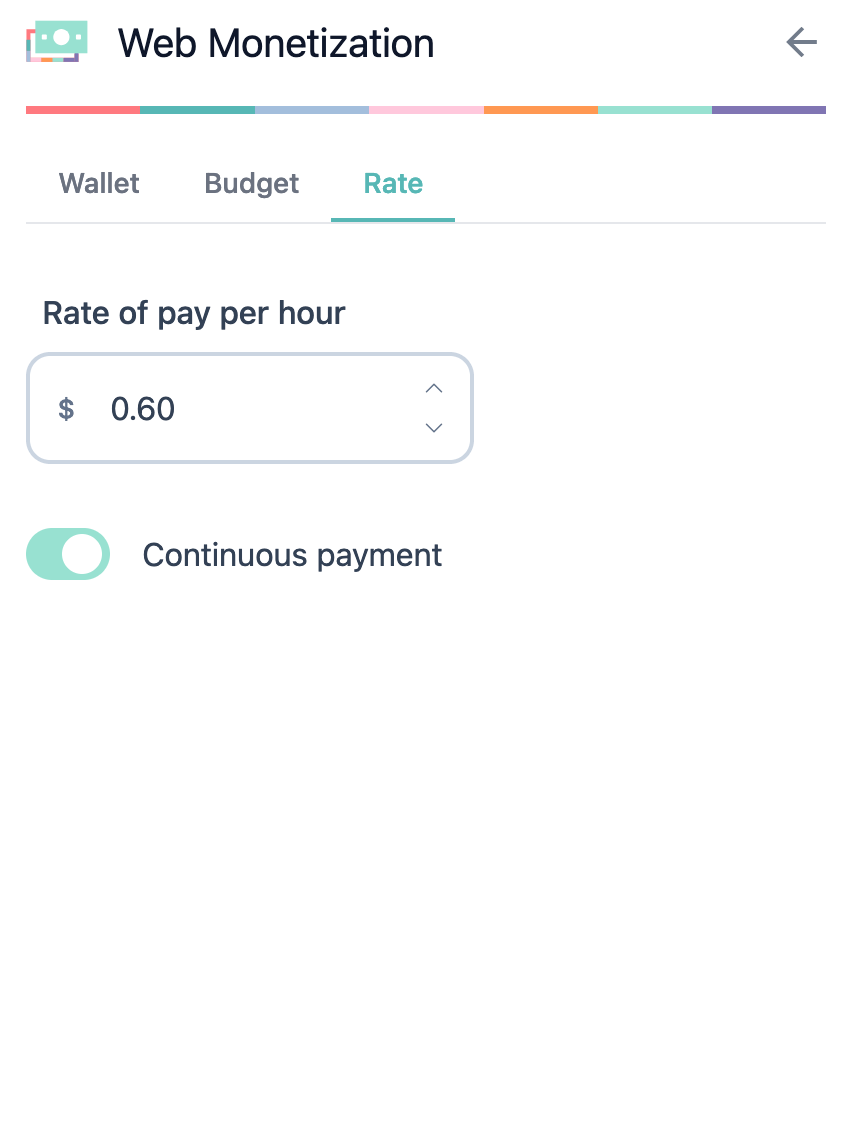
- Enter the amount the extension will send, per hour, to web monetized sites. Alternatively, select the Continuous payment toggle to turn continuous payments on or off for all web monetized pages.
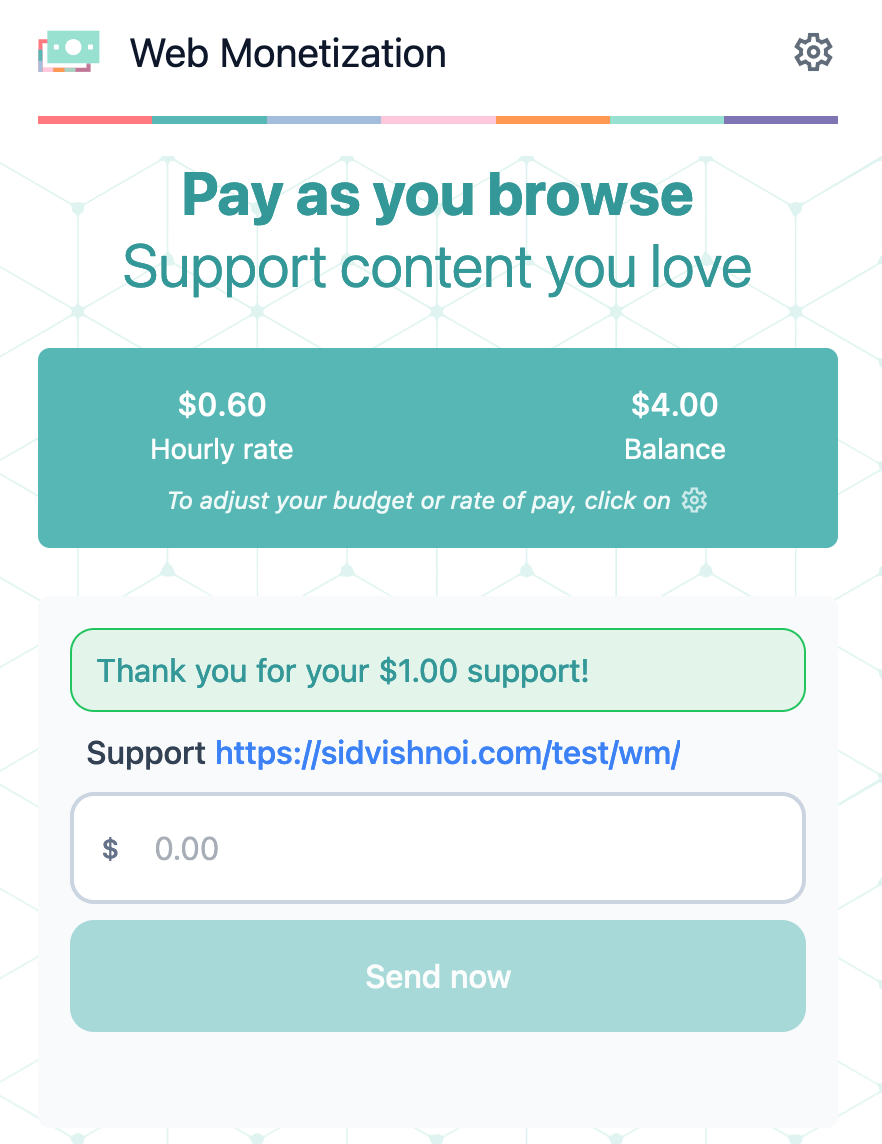
Make a one-time payment
Section titled “Make a one-time payment”You can make a one-time payment to a page instead of — or in addition to — continuous payments. The amount of the one-time payment is deducted from your budget.
- Ensure the address shown above the amount field is the page you intend to pay.
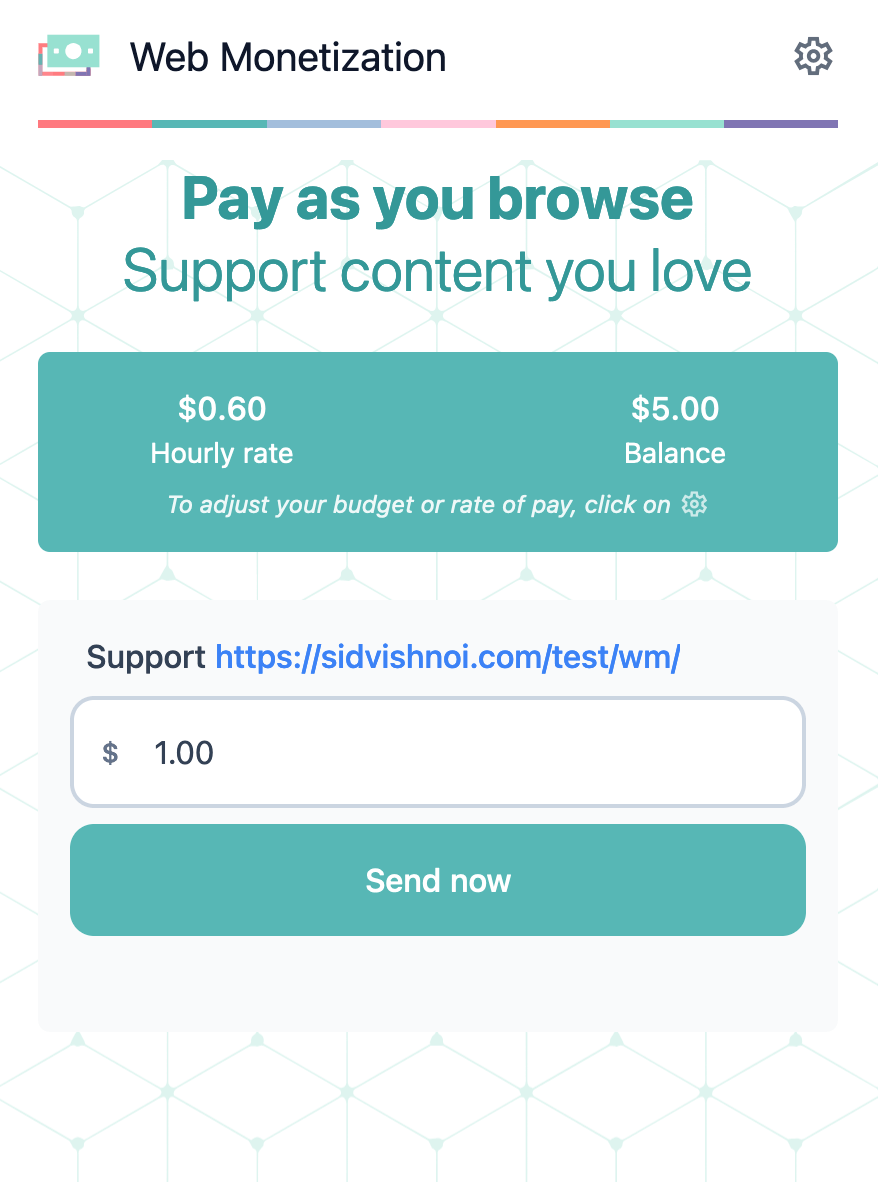
- Enter an amount. Be sure your balance can cover the amount, otherwise the payment will fail. Click Send now.
Adjust your budget
Section titled “Adjust your budget”About your budget
Section titled “About your budget”Your budget is the amount you’ve given the extension permission to spend from your wallet. If you spend your budgeted amount, the extension will display an orange circle in the toolbar and show an “out of funds” message. You can manually add more funds using the steps below.
If your budget is set to renew monthly and you are out of funds, you can:
- Wait for your budget to renew (your renewal date is shown in the extension) or
- Manually add funds
If you choose to add more funds, the amount you enter will become your new renewal amount and your renewal date will change.
Change your budget settings
Section titled “Change your budget settings”- Click the Settings icon in the upper-right of the extension.
- Select the Budget tab.
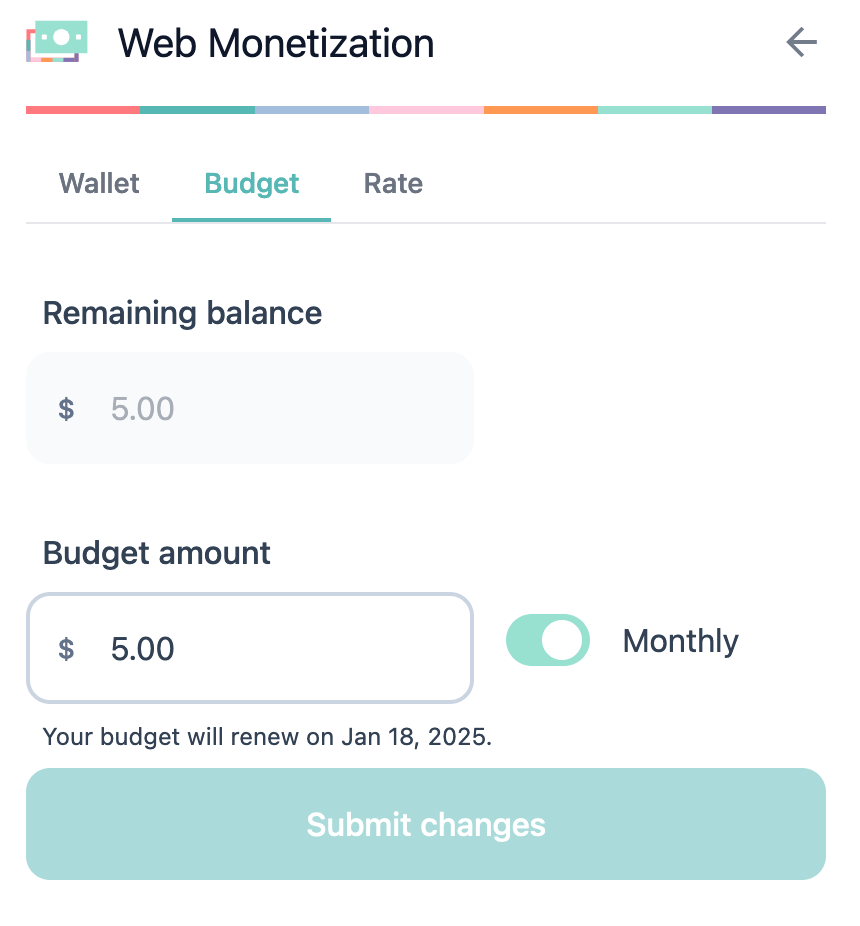
- Enter the new amount in the Budget amount field.
- Select the Monthly toggle to turn monthly budget renewals of your budget on or off.
- Click Submit changes. A new tab opens to your wallet provider.
- Sign in to your wallet account if needed, then confirm the new budget.
Disconnect the extension from your wallet
Section titled “Disconnect the extension from your wallet”When you disconnect the extension from your wallet, the extension can no longer make payments. You can always reconnect your wallet later.
The extension only supports one wallet connection at a time. For example, if you have two wallet accounts from which to make payments, you must disconnect from the first wallet before you can connect the extension to your second wallet.
- Click the Settings icon in the upper-right of the extension.
- Click Disconnect.
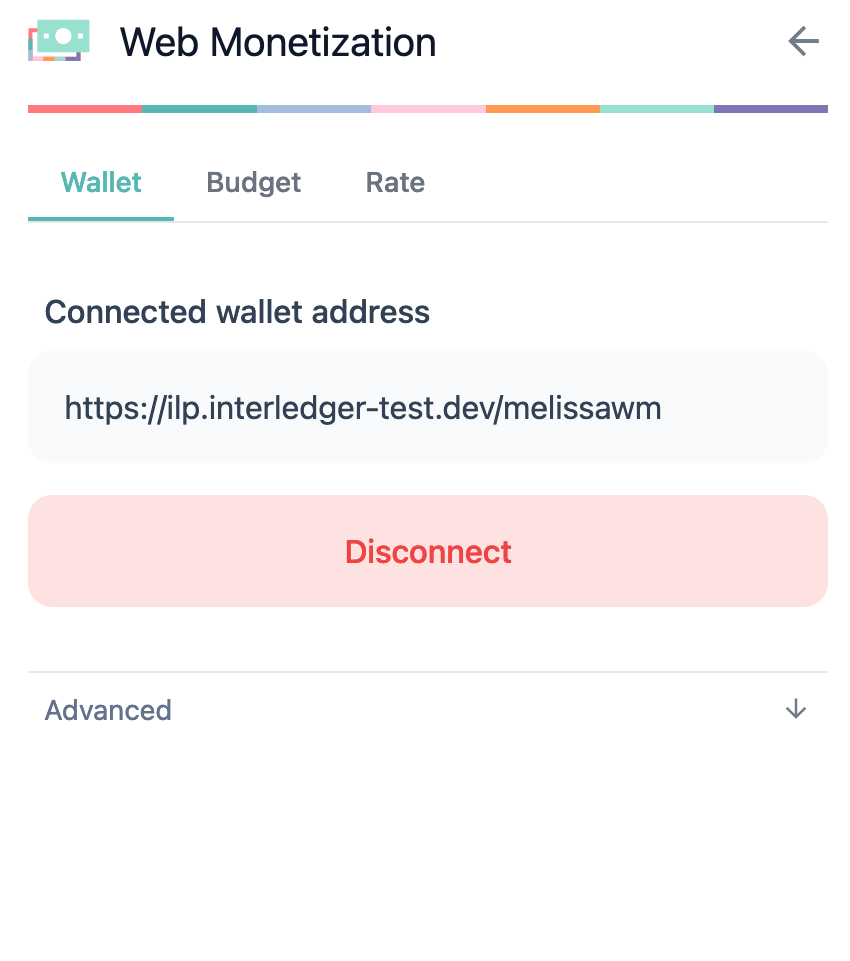 The extension’s setup screen appears with your previously used wallet address
and budget settings prefilled.
The extension’s setup screen appears with your previously used wallet address
and budget settings prefilled.
Resolve a key addition failure
Section titled “Resolve a key addition failure”When you try to connect the extension to your wallet, the extension attempts to automatically connect with your wallet provider to add a key to your wallet account.
You’ll receive an error if the extension is unable to add the key. For example:
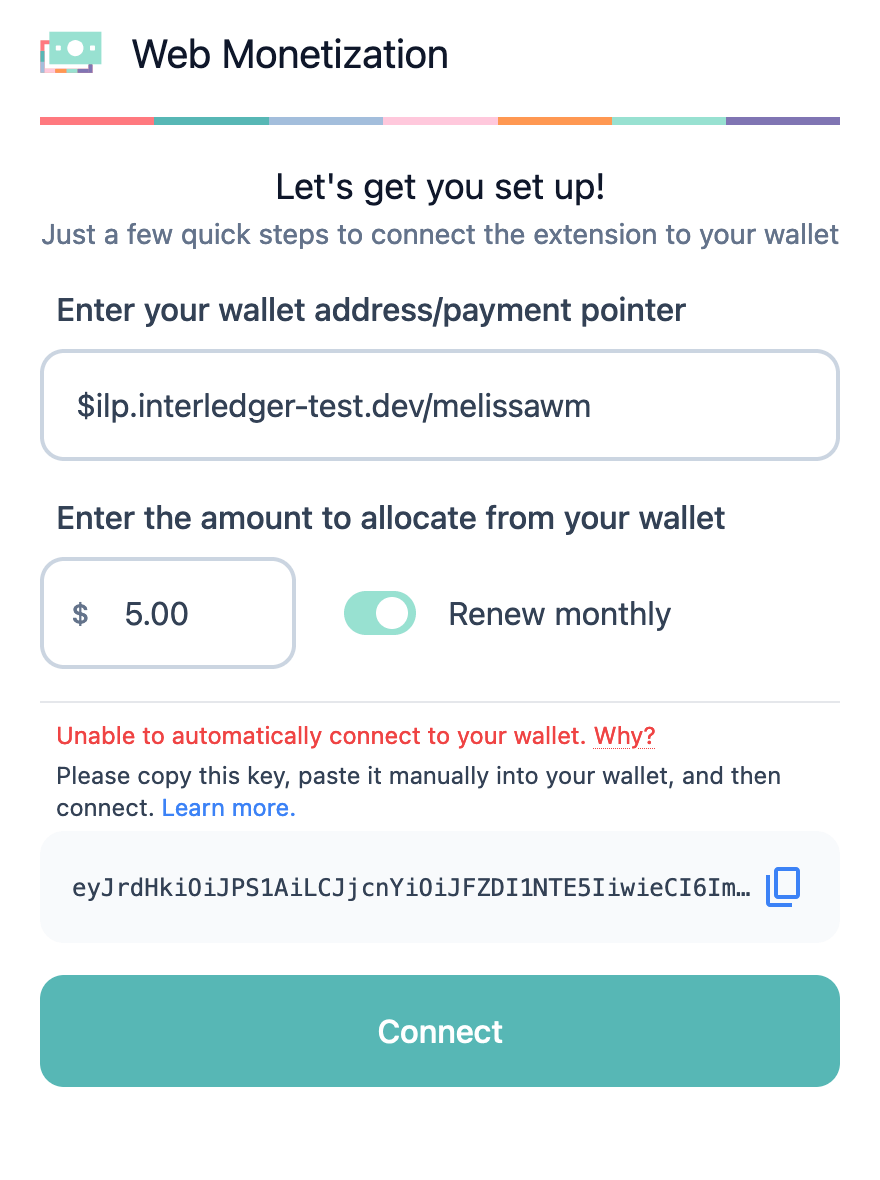
When this happens, you must copy the key that appears in the extension and manually add it to your wallet account. The steps for adding the key to your account will vary between wallet providers.
Interledger Wallet
Follow these steps if your wallet provider is Interledger Wallet.
- Sign in to your Interledger Wallet.
- Select Settings from the left menu.
- Select Keys.
- Click Add a public key.
- Enter a nickname for the key, then paste the key into the public key field.
- Click Save.
- Go back to your extension and try connecting again.
Contact Interledger Wallet at [email protected] if you need additional help.
Extension states
Section titled “Extension states”When the Continuous payment toggle is on, the extension icon appears in color. When the toggle is off, the icon appears in gray. Whether a page is web monetized does not affect the color of the icon.
Continuous payment toggled on
Section titled “Continuous payment toggled on”| Icon | State |
|---|---|
 | Page is web monetized and the extension is continuously paying |
 | Page is web monetized, but the extension needs user attention and is not continuously paying |
 | Page is not web monetized, the extension is not continuously paying |
Continuous payment toggled off
Section titled “Continuous payment toggled off”| Icon | State |
|---|---|
 | Page is web monetized, but the extension is not continuously paying |
 | Page is web monetized, but the extension needs user attention and is not continuously paying |
 | Page is not web monetized and the extension is not continuously paying |
I get an error from my wallet provider when linking the extension to my wallet. Why?
It’s hard to say without a specific error message. Two common scenarios are:
- You waited too long to accept the connection. Your wallet provider might only give you a short window to accept the connection to keep your account safe.
- You accepted the connection too quickly—within a few seconds. Your wallet provider may do this as a security measure against bots or to ensure you’ve read the contents of the screen. Interledger Wallet, for example, enforces a minimum five second wait.
Click Connect and try linking your extension again.
I know the page I’m visiting is web monetized, but the extension says its not. Why?
The most common reason is that your wallet provider and the content owner or publisher’s wallet provider are unable to transact with one another. Your extension will display an exclamation mark in an orange circle. Open the extension to read the messaging.
Visit the Web Monetization-enabled wallets page for a list of compatible wallet providers.
Why is the balance in the extension not immediately updating on payments?
After the extension shows a message that a payment succeeded, the extension’s balance may not immediately update to show the new, lower balance. This is a known issue that we’re working on. You can track its progress in GitHub issue #737.
How is the balance shown in my wallet related to the balance shown in my extension?
- Wallet balance - Your available balance; the amount you have available to spend on Web Monetization or anything else you can use your wallet balance on.
- Extension balance - The amount you’ve given the extension permission to spend.
Sometimes your extension can show a higher balance than your wallet. In this case, any Web Monetization payment that exceeds your wallet’s balance will fail due to insufficient funds.